 Save
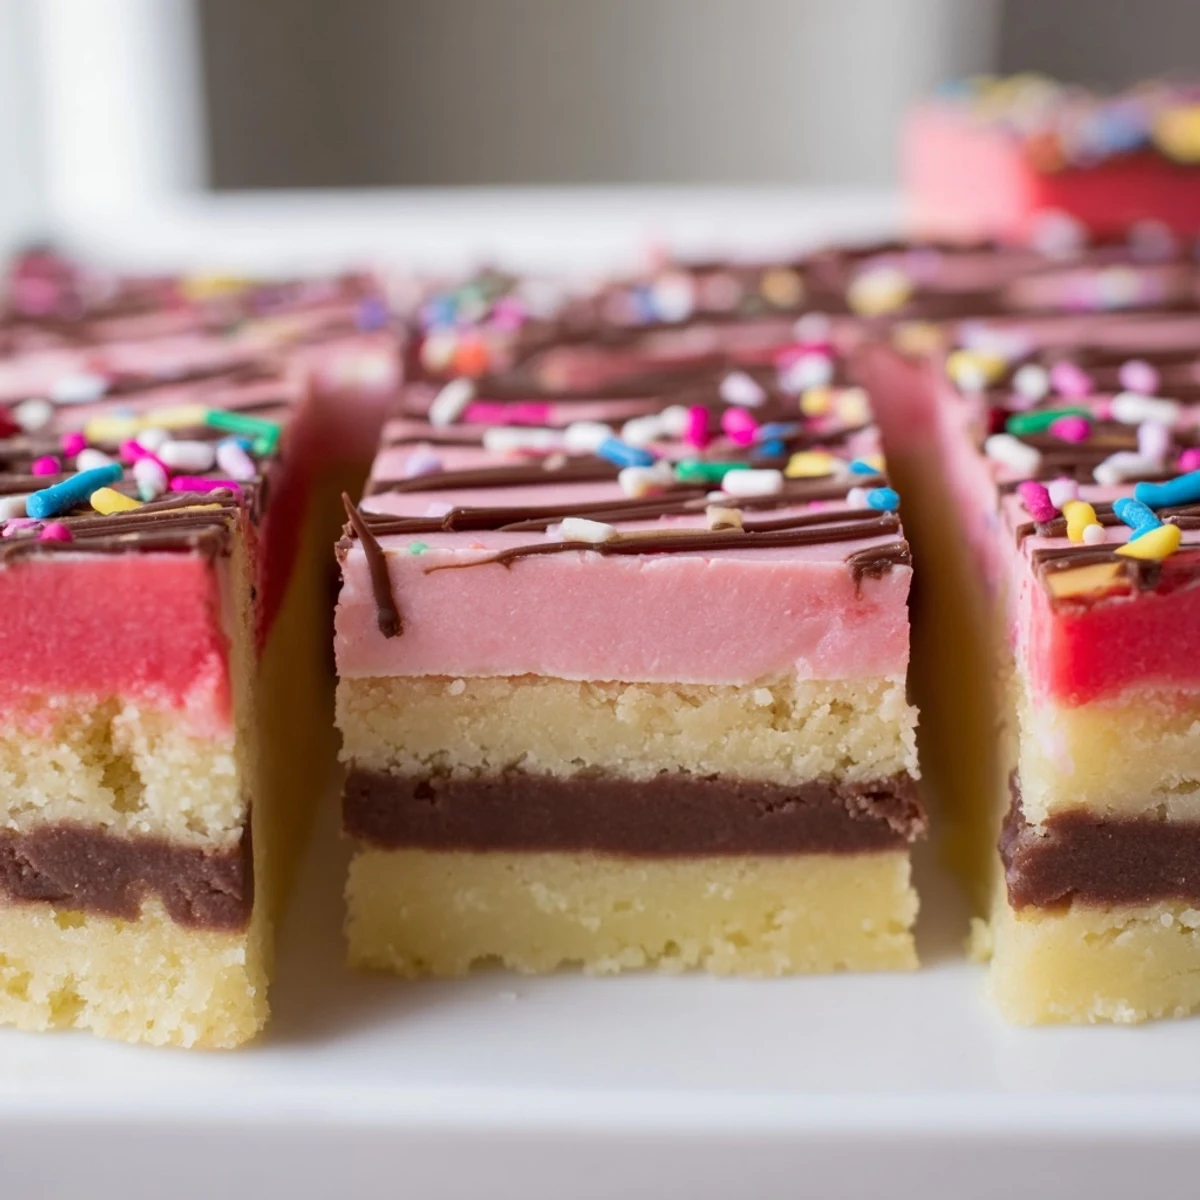
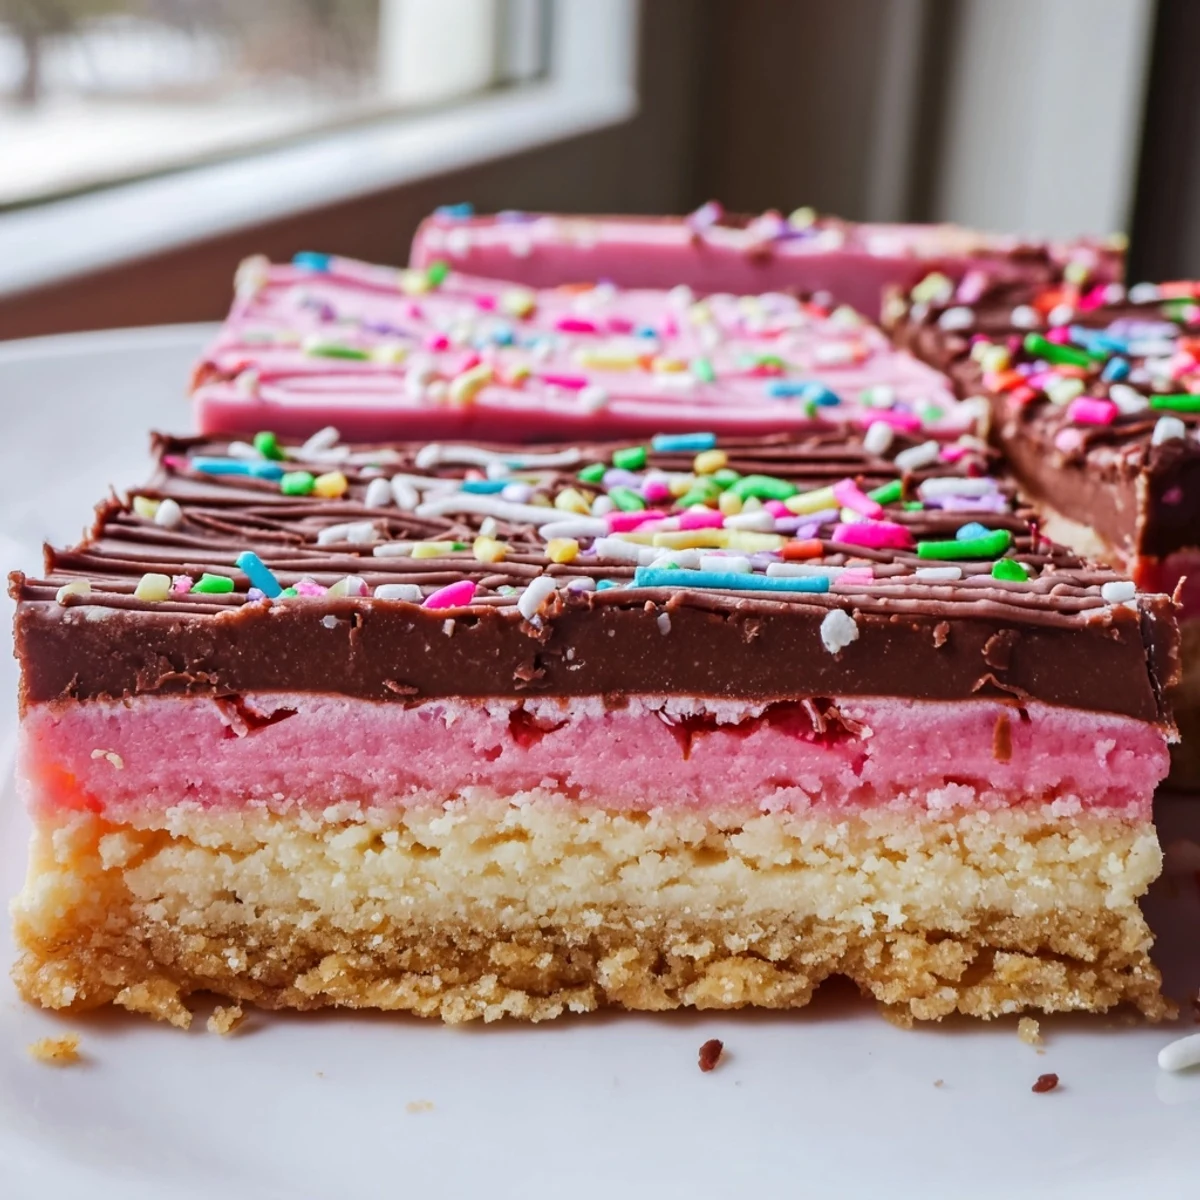
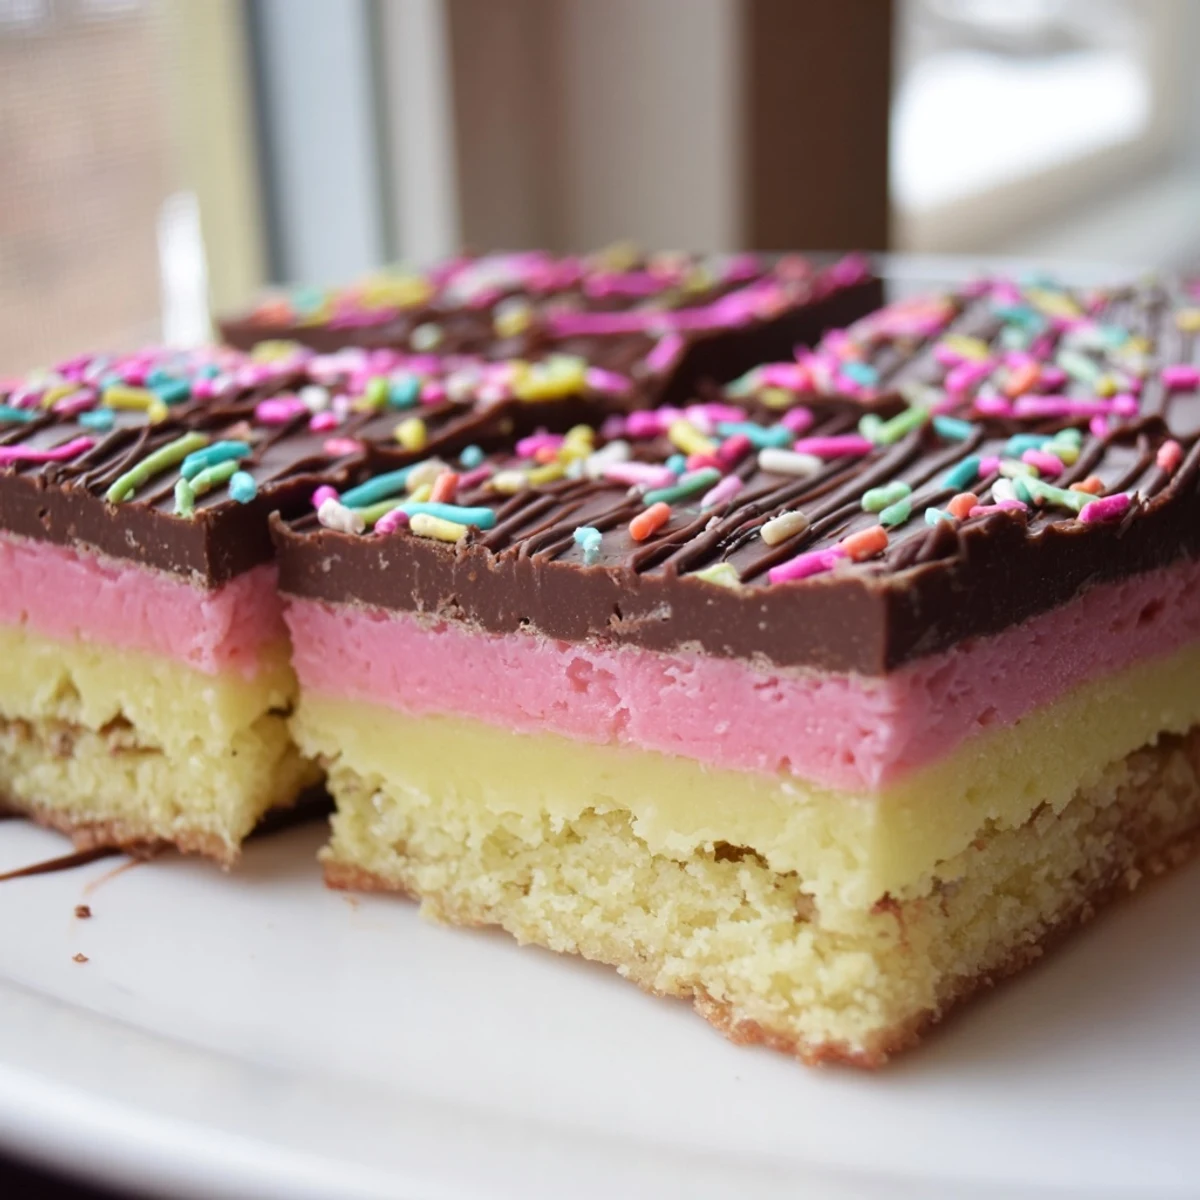
Save These Neapolitan cookies bring together three classic flavors—chocolate, vanilla, and strawberry—in beautifully layered bars. Each batch starts with a single butter-based dough that gets divided and flavored with cocoa powder, vanilla, and strawberry extract with a touch of pink coloring.
The layers are pressed into a pan one on top of another, then baked until just set. Once cooled, they're sliced into neat squares revealing the distinctive tri-color pattern that makes them so eye-catching.
Perfect for parties, bake sales, or afternoon treats, these cookies deliver the nostalgic charm of Neapolitan ice cream in a handheld form. A drizzle of melted chocolate and festive sprinkles add an optional finishing touch.
The afternoon I stumbled on Neapolitan cookies was one of those lazy Sunday experiments that turned into a full blown obsession, all because my niece declared she wanted ice cream but it was pouring rain outside. I rifled through the pantry, spotted cocoa powder and strawberry extract, and figured why not bake the ice cream instead. Three sticky bowls of dough later, I was pressing layers into a pan and hoping the whole thing wouldnt turn into a muddy mess. It didnt, and now these colorful little bars show up at every family gathering without fail.
My sister walked in just as I was smoothing the last pink layer and immediately stuck her finger right in the corner to taste test, which told me everything I needed to know about whether these were worth making again.
Ingredients
- 225 g (1 cup) unsalted butter, softened: Room temperature butter is nonnegotiable here because cold butter wont cream properly and your layers will spread unevenly in the oven.
- 300 g (1 1/2 cups) granulated sugar: This amount gives the cookies a tender crumb without making them cloyingly sweet, especially once the cocoa and strawberry flavors join the party.
- 2 large eggs: Add them one at a time and beat thoroughly between each addition so the dough stays smooth and emulsified rather than curdled.
- 1 tsp vanilla extract: Use pure extract if you can because the vanilla layer relies on this one ingredient to carry its flavor.
- 340 g (2 3/4 cups) all-purpose flour: Spoon and level rather than scooping directly from the bag to avoid packing too much flour into your dough.
- 1/2 tsp baking powder: Just a touch keeps the bars tender without making them cakey or puffed.
- 1/2 tsp fine salt: Salt sharpens all three flavors and keeps the sweetness grounded.
- 2 tbsp unsweetened cocoa powder: Dutch processed gives a deeper color but natural cocoa works fine if that is what you have on hand.
- 1/2 tsp strawberry extract: A little goes a long way and combined with food coloring it delivers that classic Neapolitan strawberry personality.
- Pink or red food coloring (gel preferred): Gel coloring wont thin your dough the way liquid drops can, keeping all three layers the same consistency.
- 100 g (3.5 oz) semisweet chocolate, melted (optional): Drizzling this over the finished bars adds a bakery quality finish that makes people think you spent far longer than you actually did.
- Sprinkles or chopped nuts (optional): A fun finish especially if you are making these for a birthday or holiday spread.
Instructions
- Preheat and prepare the pan:
- Set your oven to 175 degrees C (350 degrees F) and line a 23 x 33 cm (9 x 13 inch) baking pan with parchment paper, leaving enough overhang on the sides to lift the whole slab out later.
- Cream butter and sugar:
- Beat the softened butter and sugar together in a large bowl until the mixture turns pale and looks light and fluffy, about three minutes with an electric mixer.
- Add eggs and vanilla:
- Drop in one egg at a time, beating well after each so everything stays smooth, then pour in the vanilla extract and give it one more good mix.
- Combine dry ingredients:
- Whisk the flour, baking powder, and salt together in a separate bowl, then gradually add this to the butter mixture on low speed until a soft dough comes together.
- Divide and flavor the dough:
- Split the dough into three equal portions in separate bowls, working cocoa into one, strawberry extract and pink food coloring into another, and leaving the third plain.
- Layer the doughs:
- Press the chocolate dough flat into your prepared pan first, smoothing it with an offset spatula, then gently spread the vanilla layer on top, and finish with the strawberry dough smoothed evenly across the surface.
- Bake until just set:
- Slide the pan into the oven for 12 to 15 minutes, watching for the edges to barely pull away and the top to look set but not browned at all.
- Cool, cut, and decorate:
- Let the slab cool completely in the pan on a wire rack, then use the parchment overhang to lift it out and cut into squares or bars before drizzling with melted chocolate if desired.
 Save
Save The moment that made these cookies permanently special was watching my niece carefully separate the three colored layers and eat them one at a time, declaring each her new favorite before moving to the next.
Customizing Your Colors and Flavors
Once you understand the basic three layer technique, the possibilities open wide. Swap the strawberry for lemon extract and yellow coloring, or use matcha powder for a green layer that tastes as interesting as it looks.
Storage That Keeps Them Fresh
These bars stay wonderfully soft for up to five days in an airtight container at room temperature, and they actually taste better on day two when the flavors have had time to settle into each other.
Tools That Make a Difference
An offset spatula is honestly the unsung hero of this entire recipe because it lets you spread each layer evenly without digging into the one below it. Beyond that, a few basics carry you through.
- Parchment paper with generous overhang turns removal into a stress free operation.
- An electric mixer saves your arm and ensures the butter creams properly.
- A sharp knife dipped in hot water gives you clean, bakery style edges on every cut.
 Save
Save Every time I make these, someone asks for the recipe, and I always tell them the same thing: trust the layers and dont overthink it. They really are that simple.
Questions & Answers
- → Can I make the dough ahead of time?
-
Yes, you can prepare the dough and assemble the layers in the pan, then cover tightly and refrigerate for up to 24 hours before baking. You may need to add a minute or two to the baking time if going straight from the refrigerator.
- → Why did my layers mix together while spreading?
-
This usually happens when the dough is too warm or soft. Try chilling each portion of dough for about 15 minutes before pressing into the pan. Use gentle, even pressure with an offset spatula rather than spreading forcefully.
- → Can I freeze these cookies after baking?
-
Absolutely. Once completely cooled and cut, place the squares in an airtight container with parchment paper between layers and freeze for up to 3 months. Thaw at room temperature for about an hour before serving.
- → What can I substitute for strawberry extract?
-
If you don't have strawberry extract, you can use raspberry extract for a similar berry flavor. Alternatively, fold in a tablespoon of freeze-dried strawberry powder for natural strawberry taste and a subtle pink hue without artificial coloring.
- → How do I get clean, neat cuts when slicing?
-
Make sure the cookies are completely cooled before cutting. Use a sharp knife and wipe it clean between each cut. For extra precision, chill the slab in the refrigerator for 30 minutes before slicing, and cut in one confident downward motion rather than sawing back and forth.
- → Can I use natural food coloring instead of gel?
-
Yes, you can use natural food coloring, though you may need more of it to achieve a vibrant pink. Beetroot powder or juice works well for a natural red-pink tone. Keep in mind that natural colorings sometimes fade slightly during baking.
